Two-Parts Polyurethane Sealants (Self Leveling)

Dymeric 240
Multi-Component-Polyurethane Sealant
Product Description
Dymeric 240 is a gun grade, multi-component, chemically curing, polyurethane sealant that includes a tintable base, curative packet, and a choice of 70 standard colors.
Features / Benefits
Dymeric 240 is an all around general-purpose sealant that provides flexible, long life and durable waterproofing for both new construction and restoration projects
Applicable Standards
- Dymeric 240 meets or exceeds the requirements of the following specifications:
- • ASTM C-920, Type M, Grade NS, Class 50, Use T, NT, M, A, and O
- • Federal Specification TT-S-00227E, Type II, Class A
- • CAN/CGSB 19.24-M90, Type II, Class B
Colors
- Dymeric 240 is available as a base and curative that can be tinted to your choice of 70 different colors, or we can match a special color for you.
Covergate Rate
- 308 linear feet of joint per gallon for 1/4” x 1/4” joints.
Priming
- Where deemed necessary, use Tremco Primer #171 for porous substrates and TREMprime Non-Porous Primer for metals and plastics. Dymeric 240 typically adheres to common construction substrates without primers; however, Tremco always recommends that a mock-up or field adhesion test be performed on the actual materials being used on the job to verify the need for a primer. The field adhesion test can be found in appendixes X1 of ASTM C 1193.
Cure Time
- At 72˚F (22˚C) and 50% relative humidity, Dymeric 240 will reach full cure in 4 days regardless of the applied width and depth of bead. As the temperatures decrease, the cure time of Dymeric 240 will increase. A good rule of thumb is an additional 24 hours for every 10°F decrease in temperature
Joint Design
- Dymeric 240 may be used in any vertical or horizontal joint designed in accordance with accepted architectural/engineering practices. Joint width should be 4 times anticipated movement, but not less than 1/4” (6.4mm).
Sealant Dimensions
-
W = Sealant width, D = Sealant depth, C = Contact area.
EXPANSION JOINTS - The minimum width and depth of any sealant application should be 1/4” by 1/4” (6mm by 6mm). The depth (D) of sealant may be equal to the width (W) of joints that are less than 1/2” wide. For joints ranging from 1/2” to 1” (13mm to 25mm) wide, the sealant depth should be approximately one-half of the joint width.
The maximum depth (D) of any sealant application should be 1/2” (13mm). For joints that are wider than 1” (25 mm) contact Tremco’s Technical Service Department, or your local Tremco field representative. Tremco recommends that surface temperatures be 40˚F (5˚C) or above at the time the sealant is applied. If sealant must be applied in temperatures below 40˚F.

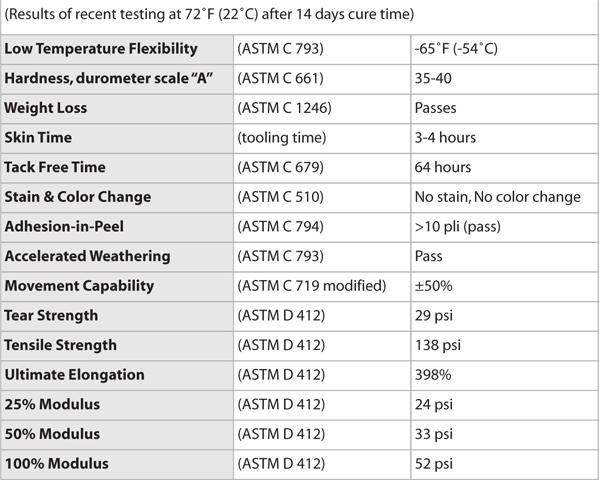
Typical Physical Properties
Joint Backing
- Closed cell or reticulated polyethylene backer rod is recommended as joint backing to control sealant depth and to ensure intimate contact of sealant with joint walls when tooling. Where depth of joint will prevent the use of backer rod, an adhesive backed polyethylene tape (bond breaker tape) should be used to prevent three-sided adhesion. All backing should be dry at time of sealant application.
Clean Up
- Excess sealant and smears along the joint interface can be cleaned up or removed with xylene or mineral spirits before the sealant skins. Any utensils used for tooling can also be cleaned with xylene or mineral spirits.
Applications
- Mix Dymeric 240 in accordance with instructions on the pail using the entire pre-measured curative and your selected Universal Color Pak. One color pack should be used with 1.5 gallon pails and two color packs should be used in the 3 gallon pails. Mix all three parts for a minimum of 6 minutes, scrapping the sides of the pail and until there are no color striations. Ensure the backer rod is friction fitted properly and any primers have been applied. Apply sealant with conventional caulking equipment filling the joint from the backer rod up. Immediately tool the sealant with a spatula to ensure intimate contact with the joint walls. Dry tooling is always preferred, although xylene can be used in limited amounts to slick the spatula if needed. For a cleaner finish, mask the sides of the joint with tape prior to filling.